Experimental photography
Tuesday, 1 February 2011
Thursday, 14 October 2010
Film printing digital negative.

I wanted to try and develop a digital photo of the sky/sea and still get all the tones within both aspects of the photo, and also create a dramatic image by using a filter for contrast, similarly to HDR photos. Because I was only using one photo rather than my HDR's 5 photos, I didn't have all the information needed to get a photo with great depth and/or detail due to over/under exposure in areas. However, I wanted to bring out all the detail possible with the photo I had. To do this I used dodge and burn methods.
First of all I set up the enlarger, using the smallest aperture possible (in this case F16), this will give me more time to dodge and burn when exposing the photo. I put in filter 5 to create the most contrast and I then set the timer to 7 seconds and made a test strip of my negative. From the negative I found that the ground and sea only needed roughly 7 seconds of exposure whereas the majority of the sky needed three times that.

(Test-strip - the ground in the furthest segment to the right is a good quality exposure and the sky in the 3rd segment to the right is of good quality exposure.)
I then proceeded to make a print of the negative using dodge and burn techniques. I kept the timer on 7 seconds and exposed the photo three times, heavily dodging the ground for the first two exposures. This improved the photo slightly, but you could easily see that it had been dodged due to a gradual fade where it parts had been exposed longer than others. It was also still slightly too dark.

(dodge and burn attempt - this dodge didn't work as you can see harsh lines where the card covered the image)
After several attempts I decided to completely dodge the ground and sea by putting thick card over the image up to the horizon. I then exposed the sky for 14 seconds and in this time dodged some of the left had side which was coming out too dark. After the 14 seconds I exposed the whole photo for a further 7 seconds while VERY gently dodging the ground and sea to get rid of any harsh separating lines. As a result of this, I had brought out the under exposed tones in the ground, sea and parts of the left-hand sky as well as keeping the tones in the majority of the sky.
If I were to edit this photo any more I would try to lighten the sky around the horizon as it is currently over exposed. However, there is little detail in the negative to bring out anything of any interest or quality.
(digital negative on acetate)
Tuesday, 12 October 2010
HDR
These are two photos I have taken and turned in to HDR photos using Photoshop...


To take these photos I used my digital SLR which was set to shutter speed priority - this is because I needed to shoot the Sam subject several times and did not want to change the aperture as this could change the appearance of the photo. I placed my camera onto a tripod and set up for taking the photos. I used ISO 800 as this gives soft tones without any grain. Once the camera is set up I take the first photo with a normall exposure composition, I then take a further 4 photos with varying exposure compositions (5 photos - Exposure comp. -2, -1, 0, +1, +2) , leaving me with 5 photos with a range of light and dark tones.
By merging together the images in Photoshop's 'HDR pro', the images are automatically merged together showing us both the highest tones and the lowest tones. This creates a great contrast resulting in a very striking and dramatic image. To really make the picture striking, I adjusted the exposure, shadows and highlights to create further contrast, giving the image great depth and something for the viewer to visually grasp. What really makes HDR photos stand out is the detail adjustment. This setting brings out the detail in tones making the picture look very dynamic. However, an over-use of this tool can make your picture look fake and/or graphical.
(Print screen from Photoshop 'HDR pro'. Before and after)

.jpg) The human mind works well with right angles, they are something our minds can easily distinguish. I chose to shoot the image above while tilting the camera to make it more visually exciting. Because the horizon seperating the sea and the sky is vertical rather than horizontal, the sky and sea are seen more as one rather than two seperat aspects of the image. It also allows the viewer to more easily see the range of tones in the sea and sky.
The human mind works well with right angles, they are something our minds can easily distinguish. I chose to shoot the image above while tilting the camera to make it more visually exciting. Because the horizon seperating the sea and the sky is vertical rather than horizontal, the sky and sea are seen more as one rather than two seperat aspects of the image. It also allows the viewer to more easily see the range of tones in the sea and sky.
.jpg)
The two photos above are single photos I have taken and edited in photoshop to look like HDRs. To do this I adjusted the levels and curves to change the lighting, giving it more depth and contrast much like an HDR. I also adjusted the exposure composition, viberance and saturation to bring out the colour and depth of tone.
The one main difference I notice when comparing the real HDRs and the photos made to look like HDRs is the loss of detail in some areas - in this case mainly the sea. This is because the light reflecting off the sea is too bright causing some over exposure and loss of detail. You don't get this in the real HDRs because you have several exposures with different exposure values, covering a large tonal range.
Monday, 11 October 2010
Gustave Le Gray

Gustave was a French photographer born in 1820. He is most well known for his sea-scapes. At the time cameras were very basic, and were unable to capture the range of tones in both the sea and the sky in a single photo without some areas of over or under exposure. To create a photo with this range of tones he took one photo of the sky and then a seperate photo of the sea, and then montaged them together (combination printing. I used this technique digitally in photoshop which can be seen on my post from the 23rd September). He was the first person to use this technique. This allowed him to get the tones within the sky and the sea, in what appears as a single photo. This, at the time, made his photo's very unique and striking as no other photographer was able to photograph the same range of tones as La Gray. However, combination printing can be very tedious as you are trying to make two photos look like one, so there may be alot of trial and error before you come out with a photo you are pleased with. To make the two photos look like one Le Gray used dodging and burning techniques in the darkroom.
Tuesday, 28 September 2010
Thursday, 23 September 2010

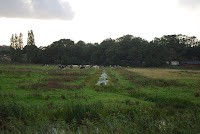
The top left image is what I chose to use for the landscape in my montage, and I used the image below for the sky. I took both photos on my digital SLR. The top image was taken with fairly standard settings, but for the photo of the sky, which was actually taken in daylight, I used a fast shutter speed (1/500) and a small aperture (F32) to capture the sky as if it were night. The sunlight coming through the clouds can be seen because it was bright
 enough to saturate the film, even with the fast shutter speed and small aperture.
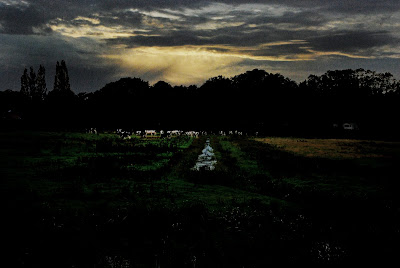
This is an montage I made in Photoshop using two photos I had previously shot. From one image I used the landscape, and from the other I used the sky.
To create this picture I had to layer the two photos. I did this by using the 'magic selection' tool in Photoshop - selecting either what I did or didn't want and keeping or discarding the selection. I then layered the sky behind the tree line of the other image. At this point I found that there was light from the sun in the landscape image, being shone on the trees that was not in keeping with the image I was creating. To get rid of this light I used the 'Burn' tool on the trees, which darkened the highlights on the trees until they were totally black (shadow).
By using the 'Levels' adjustment on the two separate layers I was able to make the image look like one, creating similar lighting in both images. Now that the two images looked like one, I was able to flatten the image and begin editing as if it were a normal image in Photoshop.
Using the 'levels' adjustment tool again, I changed the lighting of the whole image to make it appear darker like night conditions. I then used the 'sponge' tool to saturate the image from the centre outwards, and leaving the outskirts of the image less saturated. This created a kind of fading frame. I also used the burn tool to darken the outskirts.
Because the image had been so heavily edited at this point, much of the colour and tonal quality had been lost. To regain some of this quality I used the Hue/Saturation and Shadows/Highlights adjustment tools, which brought back some of the tones lost and got rid of some of the large blotches of colour.
Monday, 20 September 2010
Street Shoot


I shot these photos at night on the street outside my house using my digital SLR. Unfortunately I didn’t have access to a tripod, and because I was shooting at night using long shutter speeds, this led to some blurry images.
So that my images didn’t turn out under or over exposed I used a chart that guided me as to what aperture and shutter speed to use under street light conditions.
I chose to use ISO 400 as this would give me smooth gradients of tone while using a shorter shutter speed than would be needed for ISO 800+. By using an aperture of 5.6 I was able to get photos with a reasonable depth of field, and although the chart said to use a shutter speed of roughly 14 seconds, I used only between 1 and 3 seconds. By doing this the photos appear much darker and mysterious, leaving many objects silhouetted.

Even though the blur from the movement of the camera was not deliberate, it does look quite good in some photos. It gives them a distorted perspective, making the night appear more surreal and intriguing. Particularly in the image above, the motion from the camera gives a painterly effect.


